Contents
- Introduction
- The Application
- The Architecture
- A Simple Java Servlet
- The Web Server Service
- DocTables
- The DrinksClub Application
Introduction
XMF provides a package called DocTables that implements many useful features of HTML and allows form elements of an HTML document to be associated with XMF operations that handle events (button clicks) when they occur. XMF also provides a mechanism that allows services to be registered that are exported to Java and allow Java programs to invoke XMF operations. When the services are called, Java can pass data to XMF, the service is performed and an XMF value is passed back to Java.The DocTables package and Java services can easily be combined to allow XMF to act as a web server for a web-application whose user interface is implemented by HTML and whose application logic is implemented using any features of XMF. This is an attractive technology for web-applications because XMF provides very high-level technology features which make it easy to manage and process data. The rest of this document shows how a simple web-application can be constructed using XMF.
To top.
The Application
The application we are going to implement is a simple drinks club as found in many offices. A Drinks Club Administrator is selected who will be responsible for adding new members to the club, maintaining member's accounts and registering new drinks as they become available. When a new member is registered they have an account with some credit. Credit can be used to purchase drinks. Each time a member makes a drink they must register their purchase on the system (let's assume that everyone is highly trustworthy) and their credit is reduced accordingly. If they have insufficient credit then the system will not let them purchase the drink. When credit is exhausted, a member can contact the administrator and purchase more credit (presumably for real money!).The application is to be implemented as a web-application which runs on a server. Members and the administrator will access the application using their standard web-browser. Here is a simple example of how the system might look.
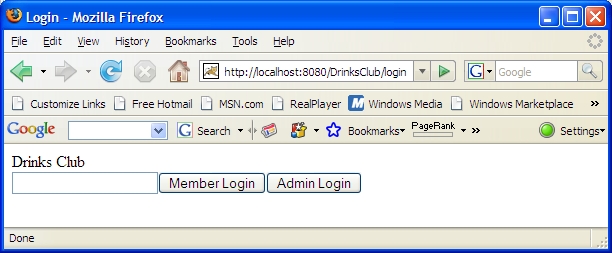
At startup, the user is provided with a login screen:
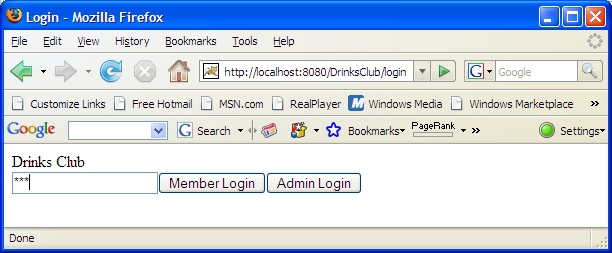
Assuming that the drinks club is new, the administrator must login:
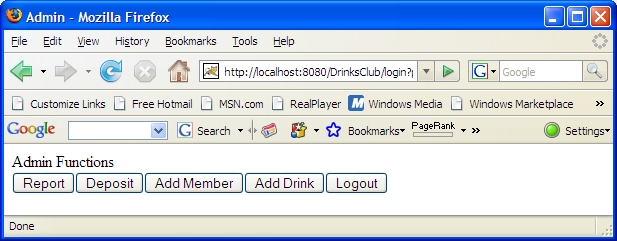
to produce an administrator page:
The adminstrator adds a member with some initial credit:

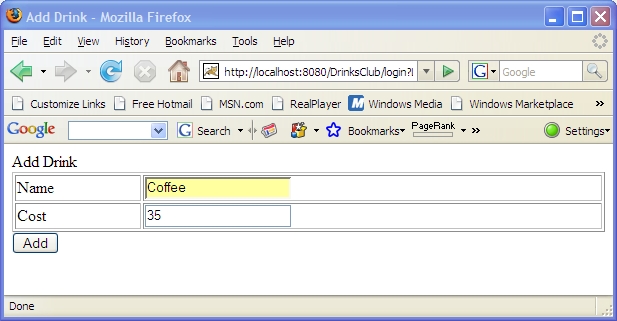
After adding further members, a drink is added:
Members login with their passwords. Fred logs in and goes to the members page:
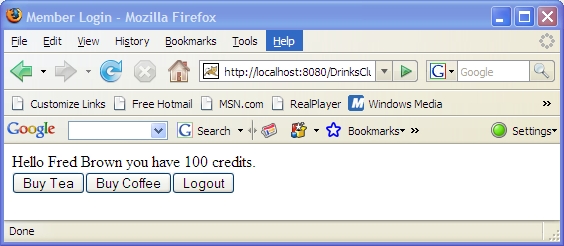
Note that there is a button for each type of drink that is available. Fred buys a coffee:
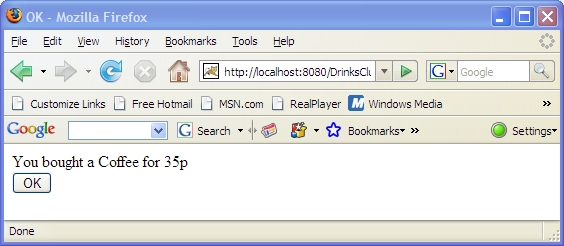
and returns to the members page:
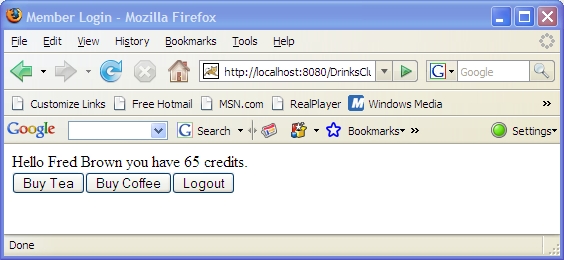
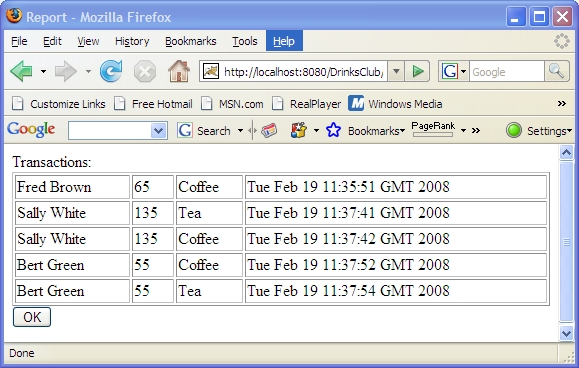
Several other members buy drinks over the day. At the end of each day the administrator prints a report of the activities:
To top.
The Architecture
The architecture for the drinks clib web application is shown below:
A servlet is deployed on the web server and registered to handle requests for the /DrinkClub/login location. When the administrator logs onto the system via a web browser, they make a request for the location /DrinksClub/login which cases the web server to ask the servlet to handle the request. If this is the first time the reqest has been made, the servlet starts an XMF VM and loads the previously saved webserver.img.
Once loaded, the servlet uses a Java service defined in Drinks.xmf to handle each request. Each time a request is made, the servlet defers to the XMF service (the VM is started once for the first request and then the same XMF VM is used). The service is provided with the session information and arguments defined in the HTTP request. The service runs and returns an HTML string that is displayed in the web browser that originally made the request.
To top.
A Simple Java Servlet
XMF is deployed onto a web server via a Java servlet. The servlet is responsible for starting the XMF Vm and passing on requests to the XMF service. This section gives an overview of the servlet.The servlet is defined as an sub-class of HttpServlet and has the following state:
public class XMFServlet extends HttpServlet {
    // The size of the XMF VM heap...

    private static final String heapSize = "5000";
    // The path to the image to be loaded into the VM...

    private static final String image    = "webserver.img";
    // The XMF VM runs (via the XMF OS) on a separate Java thread...

    private XOSThread           thread;
// The monitor is used to implement a synchronousWhen a servlet is started, it calls the init method which starts an XMF VM and loads the image:
// call via the XMF clientSend method...
private Monitor monitor = new Monitor();
public void init() throws ServletException {Each request goes through the doGet method:
// Create a new XMF thread for the servlet and load the
// appropriate XMF image with the XMF service...
super.init();
String root = getServletContext().getRealPath("/");
String[] args = { "-image", root + image, "-heapSize", heapSize };
thread = new XOSThread(args);
thread.start();
}
    protected void doGet(HttpServletRequest req, HttpServletResponse response) throws ServletException, IOException {

        // When the web browser requests the deployed location then
        // the XMF service is called to handle the request and to
        // return a new HTML string...

        response.setContentType("text/html");
        final PrintWriter pw = response.getWriter();
        String sessionId = req.getSession().getId();
        Vector<Arg> args = httpArgs(req);
        Machine machine = thread.getOs().getXVM();

        // The machine may be loading the image at this point so
        // wait until the service has called xmf.setReady(true)...

        while (!machine.isReady()) {
            try {
                Thread.sleep(1000);
            } catch (InterruptedException e) {
                e.printStackTrace();
            }
        }

        // Send is asynchronous so we need to use a Monitor to
        // enforce single threading through the machine. The result
        // is handled via a ClientResult...

        machine.clientSend("webserver", new Object[] {sessionId,args}, new ThreadInitiator(), new ClientResult() {

            public void result(Object result) {
                monitor.restart(result);
            }

            public void error(String message) {
                pw.println(message);
            }

        }, null);

        // This thread now waits for the result to be supplied
        // from the XMF service...

        monitor.monitor(pw);
    }
To top.
The Web Server Service
The servlet uses a service registered in the webserver.img image to handle any doGet requests. The service is loaded into the image before it is saved. The servlet passes the session id and the arguments (a vector of instances of the class Arg) to the service.The service is implemented by an instance of the class WebServer that has been initialised with an instance of the DrinksClub defined in the file Drinks.xmf (see below). The initialization argument to the drinks club is the administrator password (123).
The source of the service is as follows:
parserImport XOCL;To top.
import DocTables;
import Server;
Root::server := WebServer();
Root::club := Drinks::DrinksClub("123");
@Service webserver(session,args)
if server.hasSession(session)
then server.handle(session,args->collect(arg | Seq{arg.getName() | arg.getValue()}))
else server.initSession(session,club.run())
end
end;
DocTables
Before examining the implementation of the drinks club further, we need to describe how HTML pages are supported by XMF. The package DocTables defines a collection of classes that implement abstractions over HTML syntax. The idea is that you create an instance of DocTables::Basic::Page which contains entries fo all the things you want to put on the page. You then transform the Page object into an HTML string ready for display using a web browser.Things on the page that correspond to input are labelled with names. Buttons on the page are associated with XOCL operations that expect collections of bindings. When the button is pressed, the corresponding operation is called and supplied with a collection of bindings for all the input fields and selections on the page.
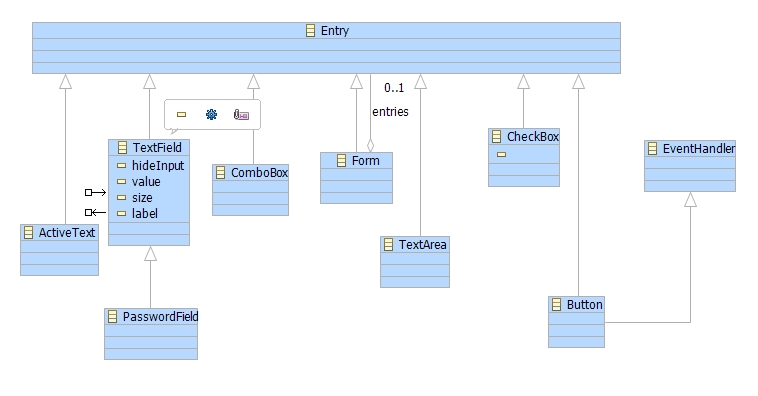
DocTables is split into two sub-packages. Basic defines all the basic markup entries including pages:

Forms defines the page entries that correspond to input fields, selections and buttons:
For example, here is a page that corresponds to the login screen for the drinks club:
  // A page has a title and some entries...

  Page("Login",Seq{

    // Text is just displayed on the page...

    Text("Drinks Club"),

    // Input fields, selections and buttons
    // must exist in a form. The form has an
    // action string that directs the web server
    // to a registered servlet, and some entries...

    Form("/DrinksClub/login",Seq{

      // A password field is a text input field
      // that hides its input. When a button
      // handler is called there will be a binding
      // for the name "password" containing whatever
      // the user typed...

      PasswordField("password",20),

      // A button has a label and a handler
      // operation. When the button is pressed,
      // the operation is called with bindings for
      // all the named declared on the page. In this
      // there are two buttons that both get bindings
      // for the name "password"...

      Button("Member Login",memberLogin),
      Button("Admin Login",adminLogin)
    })
  })

To top.
The Drinks Club Application
The drinks club is implemented as an XOCL package: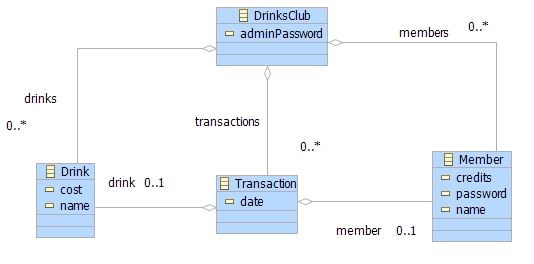
The first step in designin the Drinks Club application is to define a state machine that describes the required behaviour. In the following machine, the states correspond to pages that are to be displayed and the transitions occur as a result of buttons being pressed:

The initial state is the login page. The user either logs on as an administrator or as a member. As an administrator, buttons lead to the creation of new drinks and members, or to a report or deposit credit. As a member, buttons implement the purchase of drinks. A purchase is successful or fails depending on the funds. In general all pages have an OK or logout button that returns to a parent page.
The application works by creating an instance of the class DrinksClub which is then managed by the instance of WebServer (see here). The operation DrinksClub::run() defines the application as a state machine that is implemented as a collection of mutually recursive operations. Calling an operation implements a transition. Each operation must return a page that implements the appropriate state defined in the state machine given above.
    @Operation run()

        @Letrec

          // The login page is the start of the application...

          login() = ...

          // Handle the member login button...

          memberLogin(password) = ...

          // Handle the admin login button...

          adminLogin(password) = ...

          // Produce a report on member's activities ...

          report() = ...

          // Handle an update to the member's accounts...

          deposit() = ...

          // Display the create new member page...

          addMember() = ...

          // Register a newly defined member...

          registerMember(name,password,amount) = ...

          // Display the create new drink page...

          addDrink() = ...

          // Register the newly defined drink...

          registerDrink(name,cost) = ...

         // That's it, start with the login page...

         in login()
         end
      end
The login screen is given in the previous section. It makes a transition to either the administrator page or the member page as defined below:
          memberLogin(password) =
            @Find(member,members)
              when member.password() = password
              do Page("Member Login",Seq{

                   // Tell the member how many credits they have...

                   Text("Hello " + member.name() + " you have " + member.credits() + " credits."),
                   Form("/DrinksClub/login",

                     // Create a button for each drink that can be bought...

                     drinks->collect(drink |
                       drink.buyButton(member,

                         // The following operation is a continuation that
                         // is invoked by the member when they have bought a
                         // drink. If null is supplied then the transaction
                         // failed otherwise the transaction should be registered...

                         @Operation(transaction)
                           if transaction <> null
                           then self.addToTransactions(transaction)
                           end;

                           // Return to the member's page...

                           memberLogin(password)
                         end)) +

                     // Add a button for logging out...

                     Seq{Button("Logout",login)}
                   )
                 })

              // If the password was not recognized then loop
              // pack to the login page...

              else login()
            end;

          adminLogin(password) =
            if password = adminPassword
            then
              Page("Admin",Seq{
                Text("Admin Functions"),
                Form("/DrinksClub/login",Seq{
                  Button("Report",report),
                  Button("Deposit",deposit),
                  Button("Add Member",addMember),
                  Button("Add Drink",addDrink),
                  Button("Logout",login)
                })
            })

            // If the password was not recognized then loop
            // pack to the login page...

            else login()
            end;
The membership page delegates the construction of a buttton for each drink in the system to the instance of the class Drink. Here is the implementation of the Drink class:
    @Class Drink

      @Attribute name : String (?) end
      @Attribute cost : Integer (?) end

      @Constructor(name,cost) ! end

      @Operation buyButton(member:Member,cont:Operation)
        Button("Buy " + name,
          @Operation()
            member.buy(self,cont)
          end
        )
      end

    end
    @Class Member

      @Attribute name : String (?) end
      @Attribute password : String (?) end
      @Attribute credits : Integer (?,!) end

      @Constructor(name,password,credits) ! end

      @Operation buy(drink,cont)
        if credits > drink.cost()
        then
          self.credits := credits - drink.cost();
          Page("OK",Seq{
            Text("You bought a " + drink.name() + " for " + drink.cost() + "p"),
            Form("/DrinksClub/login",Seq{
              Button("OK",@Operation() cont(Transaction(self,drink,xmf.date())) end)
            })
          })
        else
          Page("Insufficient Funds",Seq{
            Form("/DrinksClub/login",Seq{
              Button("OK",@Operation() cont(null) end)
            })
          })
        end
      end

    end
Modification of the current credits for members by the administrator is handled by the deposit page as follows:
          deposit()=
            Page(Seq{
              Text("Deposit"),
              Form("/DrinksClub/login",Seq{
                Table("",

                  // Generate a row for each registered member...

                  members->collect(member |
                    Row(Seq{
                      Col(Text(member.name())),

                      // The text field has a label that is the
                      // name of the member. When the button is
                      // pressed, the button handler will be supplied
                      // with bindings for each of the labels...

                      Col(TextField(member.name(),20,member.credits()))
                    })
                  )
                ),
                Button("OK",
                  @Operation(env)

                    // The supplied env contains bindings for each
                    // of the members. The name of the member is used
                    // as the key in the binding...

                    @For member in members do

                      // Modify the credits for each member based on
                      // the values from the table in the page...

                      let amount = env.lookup(member.name())
                      in member.setCredits(amount.asInt())
                      end
                    end;
                    adminLogin(adminPassword)
                  end)
              })
            });
To top.