Contents
- Introduction
- A Simple Application : The Finite State Machine
- Creating the Source Files
- Starting XMF
- Compiling and Loading the Binaries
- Running the Application
- Summary
Introduction
XMF can be used in a stand-alone mode where the XMF VM runs as a DOS
application. The user interacts with XMF through a DOS window running
an XMF command-line interpreter. XOCL source code is developed using a
third-party file editor (in this example we will use Eclipse) and
loaded into XMF via commands typed in the DOS window. Applications can
be developed interactively, by loading them into the running XMF
system, running the application, observing the results, editing the
files and re-loading. This cycle can be repeated as many times as
required until the application is complete. Once complete, you can save
the application as an XMF image which can be re-started any number of
times.
This tutorial introduces XMF in stand-alone mode by developing a small application from start to finish. The tutorial uses many of the features that you will use when developing your own XMF applications.
All the source files for this application can be obtained here.
A Simple Application : The Finite State Machine
For this tutorial a simple model of a finite state machine will be constructed with some basic behaviour. A UML class diagram of the state machine model is depicted below:
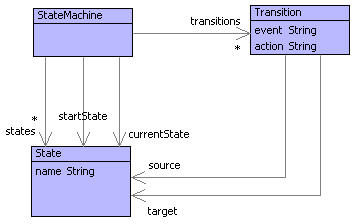
In this model, a state machine has a collection of named states and transitions. A transition has a source and target state as well as an event and action (represented simply as strings here). The application will allow users to carry out two main tasks:
- create a state machine (including the creation of states and transitions and setting the starting state)
- running a state machine (including starting and stopping the state machine, and processing events)
When a state machine is running, the user is given feedback as to the current state and any actions triggered.
Creating the Source Files
The finite state machine application required the following files:
| FSM.xmf | The FSM package that contains all the model classes. |
| State.xmf | The State class. |
| Transition.xmf | The Transition class. |
| StateMachine.xmf | The main StateMachine class. |
| Manifest.xmf | The Manifest. |
These files are all text files and should be created in the same directory. In this example they will be created in a directory called FSM in the root of the C drive. In the remainder of this section, the source code in each of these files will be presented and explained. Copy the source code in each section into the appropriate file you have created.
FSM.xmf contains the source code for the FSM package that contains all the model classes. The classes are all defined in separate files, so the source code for the package itself is very straightforward:
parserImport XOCL;

context Root
  @Package FSM

  end
It simply defines a package instance called 'FSM' to be created in the system Root package.
State.xmf contains the source code for the State class:
parserImport XOCL;

import FSM;

context ! FSM
  @Class State

    @Attribute name : String end

    @Constructor(name)
    end

  end
The State class is created (in the FSM package) with the name attribute and a constructor that takes a value for the name attribute as an argument.
Transition.xmf contains the source code for the Transition class:
parserImport XOCL;

import FSM;

context ! FSM
  @Class Transition

    @Attribute target : State end
    @Attribute source : State end
    @Attribute event : String end
    @Attribute action : String end

    @Constructor(source,target,event,action)
    end

  end
The Transition class is created (in the FSM package) with the target, source, event and action attributes and a constructor that takes a values for each of these attributes as an argument.
StateMachine.xmf contains the source code for the main StateMachine class that acts as controller for the whole application:
parserImport XOCL;

import FSM;

context ! FSM
  @Class StateMachine

    @Attribute states : Set(State) end
    @Attribute transitions : Set(Transition) end
    @Attribute startState : State (?,!) end
    @Attribute currentState : State (?,!) end

    @Operation getState(name:String)
      @Find(s,states)
        when s.name.toString() = name
        else null
      end
    end

    @Operation addState(name:String)
      if self.getState(name) = null
      then self.states := states->including(State(name))
      else "Cannot add state as a state already exists with that name."
      end
    end

    @Operation addTransition(sourceName:String, targetName:String, event:String, action:String)
      if self.getState(sourceName) <> null and self.getState(targetName) <> null
      then let source = self.getState(sourceName);
               target = self.getState(targetName)
           in  self.transitions := transitions->including(Transition(source,target,event,action))
           end
      else "Cannot add transition as source and target states do not exist with the given names."
      end
    end

    @Operation getAvailableTransitions()
      if currentState <> null
      then transitions->select(t | t.source = currentState)
      else Set{}
      end
    end

    @Operation reportCurrentState()
      "Current state is '" + currentState.name + "'"
    end

    @Operation start()
      if startState <> null
      then
        self.currentState := startState;
        "State machine started.".println();
        self.reportCurrentState()
      else "Cannot start state machine as no start state is specified."
      end
    end

    @Operation stop()
      self.currentState := null;
      "State machine stopped."
    end

    @Operation processEvent(event:String)
      if currentState <> null
      then
        @Find(t,self.getAvailableTransitions())
          when t.event = event
          do self.currentState := t.target;
             ("'" + event + "' triggered '" + t.action + "' action.").println()
          else "No action triggered.".println()
        end;
        self.reportCurrentState()
      else "The state machine has not been started."
      end
    end

  end
The StateMachine class is created (in the FSM package) with the states, transitions, startState and currentState attributes, as well as a collection of operations which define the application's behaviour. The following operations cover the behaviour required when creating and setting up a state machine:
| getState(name) | Returns the state with the given name if there is one, otherwise returns null |
| addState(name) | Adds a state with the given name if one does not already exist. |
| addTransition(sourceName, targetName, event, action) | Adds a transition between the states with the given source and target names if they exist. |
The following operations define the behaviour required when running a state machine:
| getAvailableTransitions() | Returns the available transitions based on the current state. |
| reportCurrentState() | Returns a string reporting the current state. |
| start() | Starts the state machine if a start state is given. |
| stop() | Stops the state machine. |
| processEvent(event) | If an available transition matches the event given, then the transition's action is triggered and the current state is set to target state of the transition. |
The manifest is a compile, build and load manager for the source files in a directory:
parserImport Manifests;

@Manifest FSM
  @File FSM end
  @File StateMachine end
  @File State end
  @File Transition end
do FSM.init(); null
end;
The manifest is defined to compose of the other source files. The do clause of the manifest definition specifies an action to be carried out after the files in the manifest have been loaded. Further information regarding manifests can be found here.
Starting XMF
To start XMF (to compile and load the source files and run the application), you need to start a command shell (such as a DOS or Unix shell). The working directory needs to be set to the XMF system root directory, and then XMF is started by typing the following at the command prompt:
bin\compiler . -workspace ../..
XMF will start and the shell should look something like this:
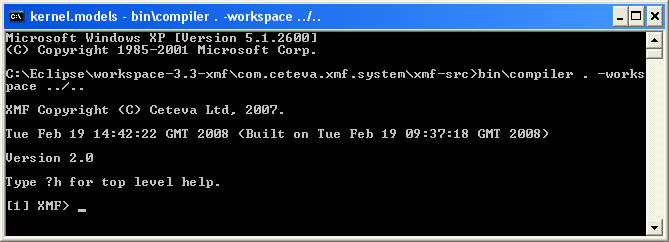
XMF is now awaiting your commands.
Compiling and Loading the Binaries
To compile the binaries, you need to start XMF as described above, and type the following commands in:
  ?c C:/FSM/Manifest
  ?m bl C:/FSM
The first will compile the manifest, and the second instructs the manifest to build and load itself (in other words to compile its constituent files) and load the resulting binaries into the system. The 'b' and 'l' in the second command mean 'build' and 'load' respectively. You can separate these steps out if necessary into two commands (?m b followed by ?m l).
After successful compilation and loading, the shell should look like this:
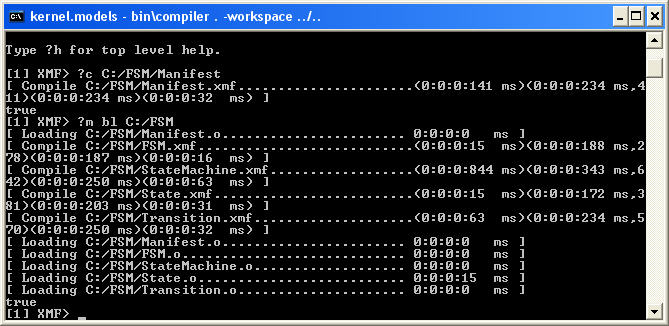
The finite state machine classes have now been compiled and loaded, and the application is now ready to run.
Running the Application
The remainder of this tutorial illustrates the finite state machine application by creating and running a state machine for a simple alarm system, as depicted below:
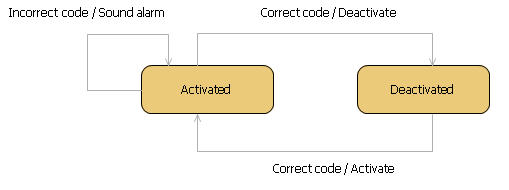
There are two states of the system: 'Activated' and 'Deactivated', and three transitions: which represent events triggered by an external user (text before the slash) and resulting actions if the transition is navigated (text after the slash). The system starts in the 'Deactivated' state.
If you have not closed XMF since the last step, then you are ready to go. Otherwise start up XMF and load the manifest using:
?m l C:/FSM
Before continuing, it is useful to import the FSM package into the top level machine, so that the classes do not need to be qualified every time (i.e. so you can type 'StateMachine' rather than 'FSM::StateMachine'). This is done using the following command:
?i FSM
You can now create a StateMachine instance:
sm := StateMachine();
Now add the states for the alarm system example:
  sm.addState("Activated");
  sm.addState("Deactivated");
Note that if you try and add a state with a name that already exists, you get the following error message:
Cannot add state as a state already exists with that name.
Now add the transtions for the alarm system example:
  sm.addTransition("Deactivated","Activated","Correct code","Activate");
  sm.addTransition("Activated","Deactivated","Correct code","Deactivate");
  sm.addTransition("Activated","Activated","Incorrect code","Sound alarm");
You now have all the states and transitions, so try running the state machine:
sm.start();
The system will give you another error message, this time telling you that you need to specify a start state:
  sm.setStartState(sm.getState("Deactivated"));
  sm.start();
This time, the state machine starts and tells you the current state is 'Deactivated'. Try processing an event:
sm.processEvent("Incorrect code");
The state machine tries to process the event and reports the following:
  No action triggered.
  Current state is 'Deactivated'
In other words, there is no available transition from the 'Deactivated' state that has the event 'Incorrect code', if instead you get the state machine to process a 'Correct code' event, the state machine will report:
  'Correct code' triggered 'Activate' action.
  Current state is 'Activated'
The alarm system is now activated. If an 'Incorrect code' event is processed now, the state machine will report:
  'Incorrect code' triggered 'Sound alarm' action.
  Current state is 'Activated'
The alarm has been sounded.
Summary
This tutorial has demonstrated how a simple application can be created and run using XMF as a standalone engine.