Contents
- Introduction
- Architecture
- Writing Eclipse-XMF applications using the Eclipse IDE
- Running Eclipse-XMF applications
- Summary
Introduction
XMF is a dynamic programming language which consists of
many features not found in languages such as Java. Perhaps the most
significant feature is the ability to arbitrarily extend XMF with
new language features to the extent that the whole of XMF is defined
in terms of itself ! Although this may seem a little circular and
academic, the important point is that XMF is designed fundamentally
to be extended and it uses itself to test the expressibility of those
extensibility features. XMF is a powerful language in many
applications including Data Intelligence Applications, System and
Software Modeling and Domain Specific
Languages. For more information about XMF, and why it should
be used, see here.
Eclipse is a state of the art Java framework for defining
applications. Typically these are rich user interface
applications which in the early days were pre-demoninately being IDEs
for languages such as Java and C++, but have recently included
applications ranging from graphical modeling tools such as Rational
Software Developer to collaborative working applications such as Lotus
Notes. XMF and Eclipse can be used in tandem for defining
applications that on one hand leverage the rich user experience of
Eclipse and on the other capitalise on the rich language features and
dynamicity of XMF. In this article we outline how these two
complimentary technologies can work seamlessly together using a
trivial Hello XMF example.
Architecture
A high level overview of the Eclipse XMF integration
architecture is shown in Figure 1. On the left is a conventional
Eclipse program written as Java plug-ins and on the right is an XMF
program that performs some functions that the Eclipse application needs
to make use of. An XMF program exposes some or all of its
functions as parameterized services which can be looked up and invoked
in Java code.
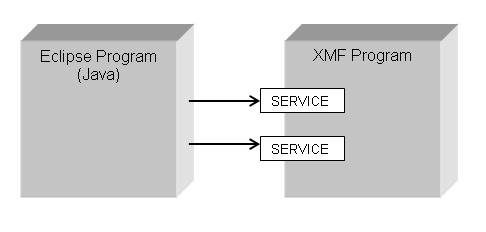
Figure 1
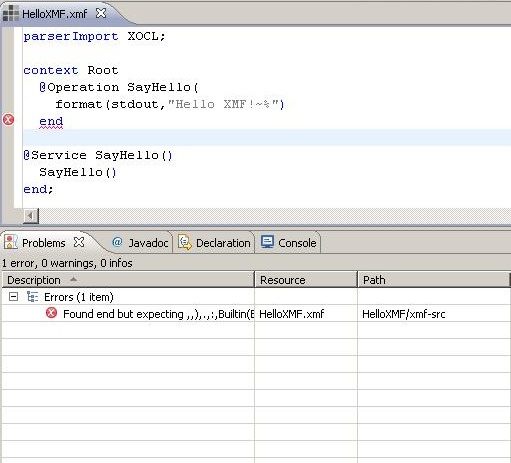
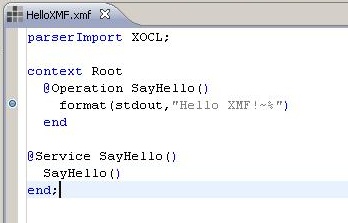
To exemplify this, here is an XMF program for printing out "Hello XMF!" which includes the definition of a single service SayHello (more information about the XMF syntax and semantics can be found here). This file is called HelloXMF.
parserImport XOCL;

context Root
  @Operation SayHello()
    format(stdout,"Hello XMF!~%")
  end

@Service SayHello()
  SayHello()
end;
Typically XMF programs are associated with a Manifest file
(not to be confused with the Eclipse OSGI Manifest file). This is
a record of the different resources that make up the XMF program and
is used for a number of purposes including compiling a program's source
code into binaries and loading the compiled program onto a XMF
machine so that it can be run. The Manifest file for the above
program looks like this.
parserImport Manifests;

@Manifest HelloXMF
  @File HelloXMF end
end;
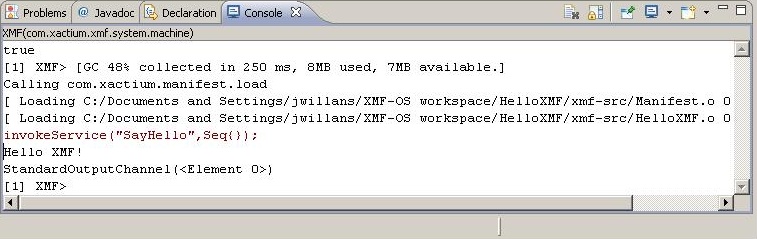
This service can be invoked in Java code using this code.
XMFMachine machine = XMFMachineRegistry.getMachine("com.ceteva.xmf.system.machine");
machine.loadManifest("HelloXMF","xmf-src");
machine.invokeService("SayHello",new Object[0],null);
The code snippet above does the following.
- Looks up an XMF machine. An application can make use of several machines if required, the machine com.ceteva.xmf.system.machine is supplied by default.
- Loads the program on to the machine using its the
Manifest. The loadManifest is supplied with the name of the
plugin and the relative location of the Manifest file which contains
the XMF program.
- Invokes the service SayHello
with no parameters and no result handler.
Steps 2 and 3 are not necessarily performed together because
it is usually necessary to load an XMF program once for each
application runtime (unless it dynamically changes) but services are
typically invoked on the program many times during an application
runtime.
Writing
Eclipse-XMF applications using the Eclipse IDE
The default version of Eclipse supports the development of Eclipse
application plug-ins, the Ceteva supplied XMF Eclipse IDE extends
this capability so that Eclipse/XMF applications can be written in a
unified environment.
Creating a new
Eclipse-XMF Project
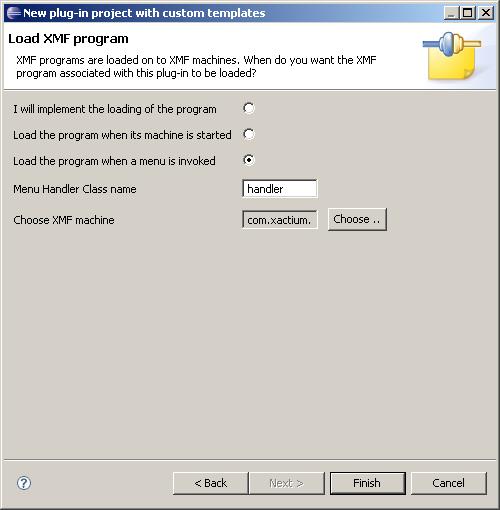
The first step in creating an Eclipse/XMF application is to
create a new project which is performed in the same way as creating a
regular Plug-in project but using the template "Plug-in with XMF
Integration". The next step of the wizard determines when the
XMF program should be loaded. Unlike Java, XMF programs are
not loaded on to a machine by default and it is necessary to explicitly
do this. The wizard offers three options:
- The user can implement the loading of the program by hand, in
which case the wizard does nothing. The Java code to do this
would typically look like:
machine.loadManifest("HelloXMF","xmf-src"); -
The program can be loaded automatically when the XMF machine starts. Machines are started either eagerly when the application is first started or lazily when the machine is first looked up using Java code of the type:
When this options is chosen, the wizard automatically adds an extension to the newly created project which loads the program onto the chosen machine:XMFMachine machine = XMFMachineRegistry.getMachine("com.ceteva.xmf.system.machine");<extension
point="com.ceteva.xmf.integration.program">
<XMFProgram
machine="com.ceteva.xmf.system.machine">
</XMFProgram>
</extension> - The wizard can generate a menu handler which is added to items of
the type IResource. The generated menu handler plays a dual role
of both loading the XMF program on to the machine chosen in the
wizard, and also providing a place holder for writing Java code which
invokes services provided by the XMF program when the menu is chosen:
   public void run(IAction action) {

	// Invoke a service on a machine, services are machine dependent
	// but the most general form is 'getMachine().invokeService(..)'

   }
 |
 |
The project resulting from running the wizard is identical to a
conventional plug-in project with a few additional features as shown
below.
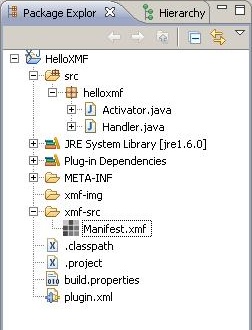
- If a menu handler is chosen to be generated, this will exist in the newly created project.
- An xmf-img folder exists in the root of the project. This can be safely ignored for the time being and will be addressed in later tutorials.
- An xmf-src folder
exists in the root of the project. This is the container of all
source code for XMF programs and plays a parallel role to the Java src folder. Initially the
folder contains just a Manifest file.
The role of XMF Manifest files has been discussed in the previous
section, the next section will describe how the Eclipse IDE uses these
to manage the construction of XMF programs.
Writing XMF source code
XMF program source files are structured into a tree under the xmf-src folder. XMF folders can be created via the New -> XMF Folder right click menu, the menu for XMF files is in the same place. When an XMF files and folders are created, renamed and delete, Eclipse automatically takes care of ensuring that the Manifest file is kept fully up to date. It is still sometimes necessary to manually the edit the Manifest file, for example to enforce a particular load ordering, but for most other cases Eclipse will manage these for the user. XMF files can be edited in the normal way, the IDE supports syntax highlighting and the incremental compilation of Eclipse source programs into machine-runnable binaries.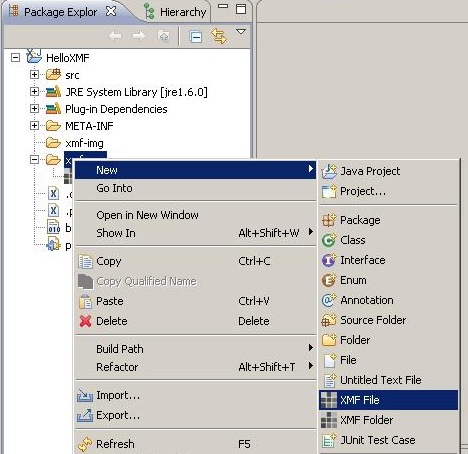 |
 |
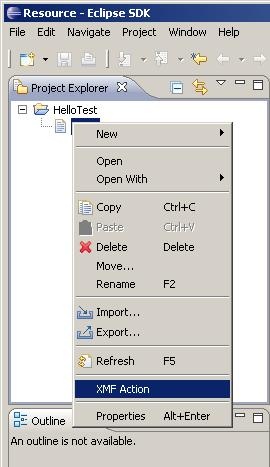
Testing without launching
XMF services can be tested without having to launch an Eclipse
Application. This is done in two steps:
- By right selecting the top-level manifest (immediately under xmf-src) and selecting XMF -> Load Manifest. This will load the XMF program on to the default machine com.ceteva.xmf.system.machine.
- By running the service from the console for the machine com.ceteva.xmf.system.machine.
This is performed by using the invokeService command which takes the
service name and a (possibility empty) sequence of parameters. In
the case of invoking the service SayHello,
this would look
like:
invokeService("SayHello",Seq{});
Running Eclipse-XMF
applications
The program for the XMF service SayHello looks like the following:
parserImport XOCL;

context Root
  @Operation SayHello()
    format(stdout,"Hello XMF!~%")
  end

@Service SayHello()
  SayHello()
end;
The automatically generated Eclipse menu handler is augmented to
invoke the service:
package helloxmf;

import org.eclipse.jface.action.IAction;
import org.eclipse.jface.viewers.ISelection;
import org.eclipse.ui.IObjectActionDelegate;
import org.eclipse.ui.IWorkbenchPart;

import com.ceteva.xmf.integration.infrastructure.XMFMachineRegistry;
import com.ceteva.xmf.integration.infrastructure.XMFMachine;

public class Handler implements IObjectActionDelegate {

    static {

        // Loads a program on to a machine.  This need only happen once
        // unless the program dynamically changes.

        getMachine().loadManifest("HelloXMF","xmf-src");
    }

    private static XMFMachine machine = null;

    public static XMFMachine getMachine() {
        if(machine == null)
            machine = (XMFMachine)XMFMachineRegistry.getMachine("com.ceteva.xmf.system.machine");
        return machine;
    }

    public void setActivePart(IAction action, IWorkbenchPart targetPart) {
    }

    public void run(IAction action) {

        // Invoke a service on a machine, services are machine dependent
        // but the most general form is 'getMachine().invokeService(..)'

        XMFMachine machine = XMFMachineRegistry.getMachine("com.ceteva.xmf.system.machine");
        machine.invokeService("SayHello",new Object[0],null);
    }

    public void selectionChanged(IAction action, ISelection selection) {
    }

}
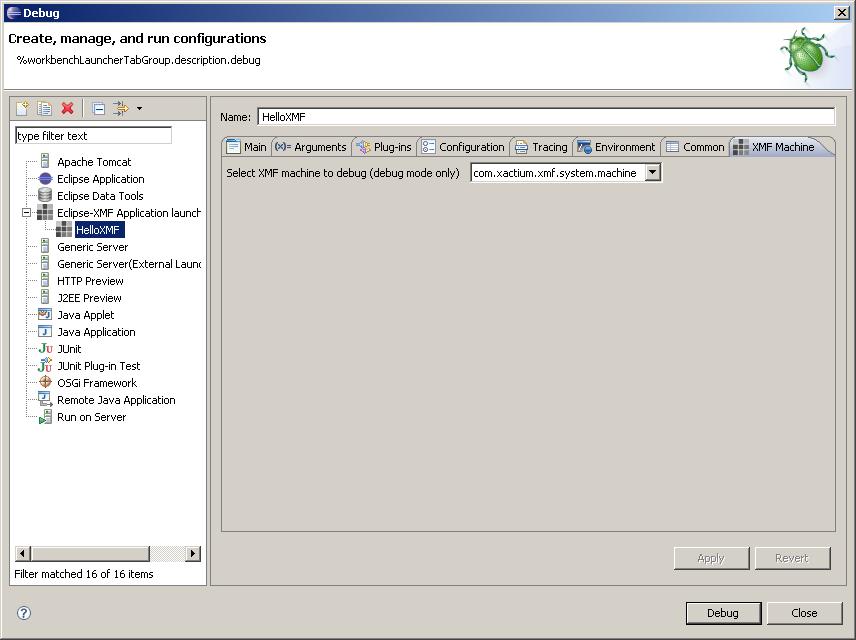
Eclipse-XMF applications run configurations are created in a
dedicated configuration type. This is identical to the standard Eclipse Application run type but
contains an extra tab XMF Machine
that is only relevant in debug mode which is discussed in a moment.

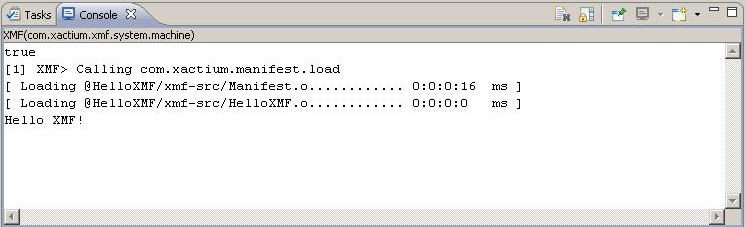
Running the Hello XMF program
from the default generated menu results in the console output shown
below. In this the Manifest is first loaded and the the service
is invoked.
 |
 |
As with conventional Eclipse applications, Eclipse-XMF programs
breakpoints can be added to source files and services executed in debug
mode. Since a single application can consists of multiple XMF
machines, it is necessary to indicate in the runtime configuration
which machine should be debugged, for example com.ceteva.xmf.system.machine.
 |
 |
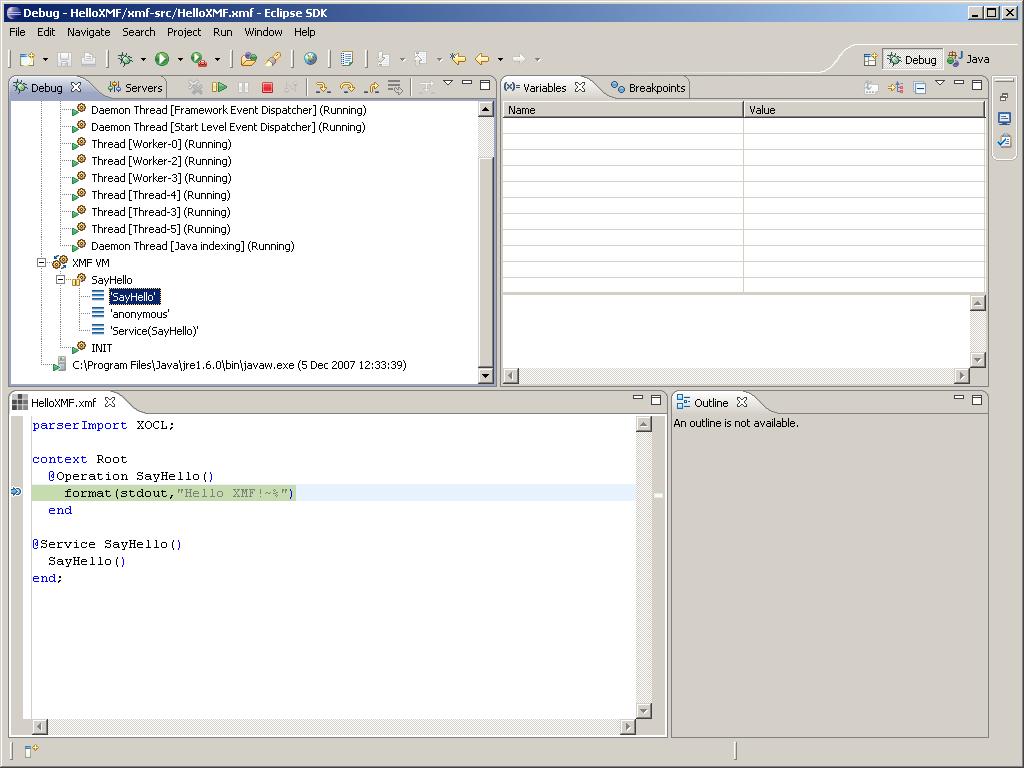
The screen shot below shows the debugger when the SayHello service is invoked in the
runtime Eclipse-XMF application.
Summary
Eclipse and XMF are a powerful combination. This article has shown how programmers familiar with using the Eclipse IDE to develop Eclipse Application can go one step further and start leveraging the power of XMF. The extended IDE support for XMF takes a great deal of the hard work away from working with XMF and enables Eclipse-XMF Applications to be developed and tested seamlessly in tandem.